Making your own custom handlebar plugs from wine corks is a nice way of recycling an old cork or two while showing some individuality. It's also an easy fix for handlebars with too small an internal diameter to accept any off-the-shelf plugs -- something that happens fairly often with cheaper aluminum bars.
I've made handlebar plugs from wine corks for a few bikes now, and feel like I have the technique down enough to share.
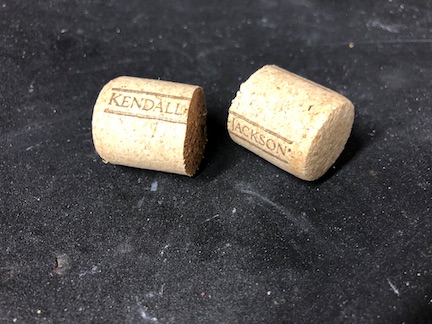
First, you'll need a wine cork, of course. Any cork will work with more or less the same steps, so I'll leave the wine cork acquistion to you.
For bars with larger internal diamters a champagne cork may work better, albeit with a bit more effort. The basic steps are pretty much the same.
Once you have a wine cork in hand and are sober enough to wield a razor knife, then proceed:
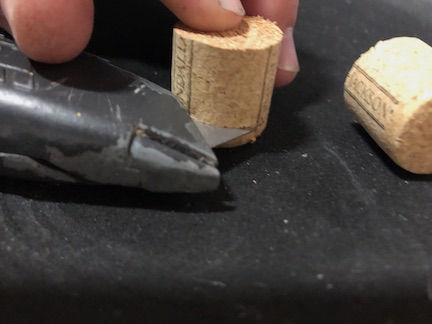
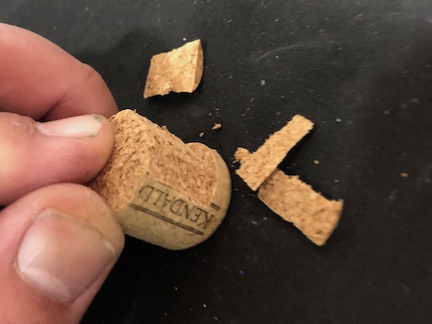
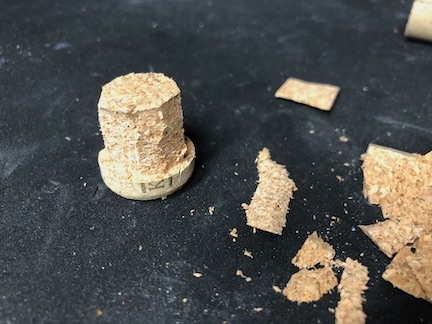
Take your standard wine cork and cut it in half with a sharp razor knife. This will let you easily make plugs for both sides from a single cork. Of course, if you want to have different corks, you can do that to. It doesn't really matter.Put the razor knife flat to your table surface and hold it there firmly. Then put your cork's uncut side down to the table surface, with the cork up to the knife blade. Once in position, carefully cut a groove in the cork by rotating it around the blade. You shouldn't need to move the blade -- just keep it steady and carefully rotate the cork to put a groove in it. If you're using a champagne cork you may want to skip this step and just cut down to the mushroom-y end of the cork in the next step.You'll want to cut the groove down to approximately the inside diameter of the bar. If you don't get it quite right, it's OK. Once your groove is cut, carefully slice downward from the cut end of the cork toward your groove, making your way around the cork. Don't overshoot the groove or the visible part of the cork will be damaged. Continue until you've shaved off enough for the cork to fit in the bars. Again, be careful, take your time, and don't cut yourself.When you're finished, you'll have a sort of mushroom-shaped cork with a nice edge and outer face. Pop it in the bars as you would any other bar end plug. If you want, you can shellac the cork with the grips, or without, to better protect and color the cork. Or just leave it natural. Either way is fine, and it's your call.
Note: This post may contain affiliate links and we may receive a small commission for purchases made through these links. This does not cost you anything, nor does it affect our opinion of the products.